Introduction
Hey there! If you're looking into optimizing texture size in your game development process, you've come to the right place. We'll delve into an algorithm developed by Sean Feeley, a Senior Staff Environment Tech Artist that is part of the creative minds at Santa Monica Studio. This algorithm, originally designed to address edge inaccuracy on foliage, has the potential to revolutionize the way we approach texture optimization in the gaming industry. Why is no one talking about it, and why have I not seen anything in the industry? I ask myself the same thing.
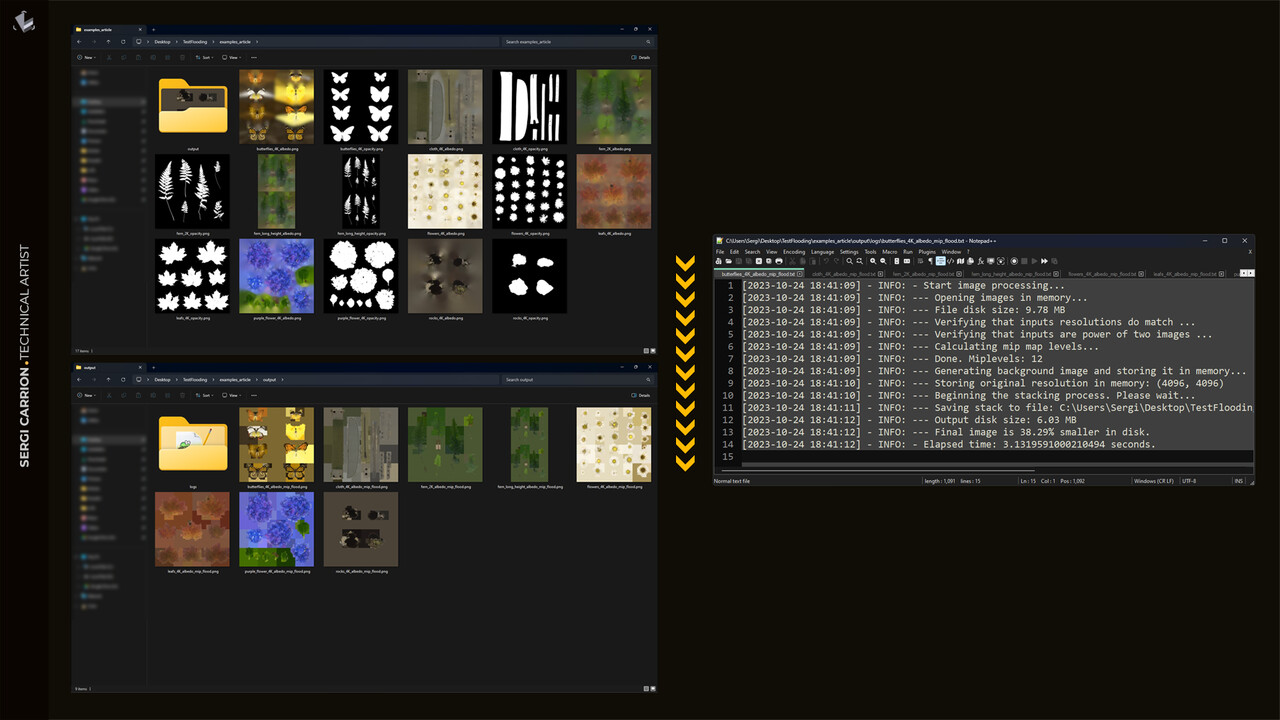
Imagine having the ability to save up to 55% on texture size in your game project. This to me sounds pretty crazy (in a good way), specially in an industry where games keep growing in size and complexity. In a theoretical 20 GB game texture pack in production, based on the average file size reduction observed in my tests, which hovers around 30%, we could potentially save an average of 6 GB of disk space.
Surprisingly, despite its incredible potential, this algorithm has remained under the radar since its unveiling at a GDC talk over four years ago.
In this article, we'll shed light on the hidden gem that is Sean Feeley's mip flooding algorithm. Not only is it a swift and efficient solution for flooding your textures, but it also offers the added bonus of improved file compression.
We'll also explore its Python implementation, which you will find available on my Github here. Why Python, you ask? Because pipelines in the gaming industry are as diverse as the worlds we create. Not everyone uses the same software, but Python is the common language that runs through many popular DCC packages. What I am about to share, provides the flexibility for Tech Artists like you to integrate this algorithm into your own pipeline.
Clarifications
When we mention that a texture or image will "compress better on disk," we are typically referring to the file size reduction achieved through image compression techniques while saving the image to storage. This reduction in file size occurs by encoding and storing the image in a more efficient format that uses fewer bits to represent the same visual information. Depending on how you are packaging your game, and the type of compression that you are using for your textures in the engine, this will not be reflected on the final build of the game.
Here's a bit more detail on what it means:
- File Size Reduction: When we compress an image for storage on disk, we use encoding methods that eliminate redundancy or unnecessary information in the image data. This process reduces the size of the image file. Smaller file sizes are advantageous because they take up less storage space, load faster, and can be transferred more efficiently.
- Visual Quality Preservation: Modern image compression techniques, like JPEG or PNG, are designed to achieve this reduction in file size while preserving visual quality to a certain extent. In most cases, the human eye won't perceive a significant loss of quality.
- GPU Loading: Once an image is loaded into the GPU with mipmaps, the GPU has to handle the compressed texture data, and the rendering cost remains similar. In this context, the "compression" primarily benefits storage and transfer. Compressed images take up less storage space on disk, which is beneficial for game distribution and loading times. The rendering cost, once the texture is in the GPU, depends on factors like the resolution of the texture, the use of mipmaps, and the GPU's texture compression capabilities. If you are using BCn (Block Compression) algorithms on your textures which is pretty default these days, mip mapping will have no effect on the final file once it is compressed and packaged in the final build.
So, "compressing better on disk" essentially means optimizing the image file's size for storage and transfer, reducing the space it occupies while preserving acceptable visual quality in editor. Once loaded into the GPU, the rendering cost remains influenced by factors related to rendering and not the initial file size.
Mip Flooding Algorithm
Developed by Sean Feeley, and presented in a 2019 GDC talk called "Interactive Wind and Vegetation in 'God of War'", this algorithm provides a simple yet powerful way to enhance the performance and storage efficiency of your game textures. Watch the full presentation here.
Steps
- For an image we use un pre multiplied color.
- At each step we scale it down to half of its size weighting the samples by their alpha coverage.
- We repeat until we get to one pixel wide or tall.
- We remember these textures, and then we walk back up the mip chain, using nearest neighbor upscale.
- We composite the higher res mip on top, and we repeat all the way back up the stack.
The implementation you will find on my GitHub is slightly different from the steps mentioned in the talk. Unlike the traditional mip flooding approach, mine doesn't require walking down the mip chain, storing all the textures in memory, and then walking back up to composite them. Instead, at each step, it stores only the current mip and the final stack, streamlining the optimization process.
"This is fast to generate, and it scales well with the image size, because of the logarithmic component to the algorithmic time complexity, and on disk, this will compress better, because of those large areas of constant color."
GDC. (2019, Sean Feeley). Interactive Wind and Vegetation in “God of War” [Video]. YouTube. https://www.youtube.com/watch?v=MKX45_riWQA
Real-world Application
Now that we've explored the Mip Flooding Algorithm and its principles, let's take a look at how you can practically apply it to optimize textures in your game development workflow. The idea behind is that each tech artist or team takes the functionality I provide, and like I mentioned in the introduction, you adapt it and build your tool on top of it. You can implement this in Unreal, Houdini, Substance Painter/Designer, or any other DCC package that supports Python scripting. Alternatively, you have the flexibility to integrate it into your standalone tool.
The current implementation takes:
- color map absolute path
- alpha mask absolute path
- output file name absolute path.
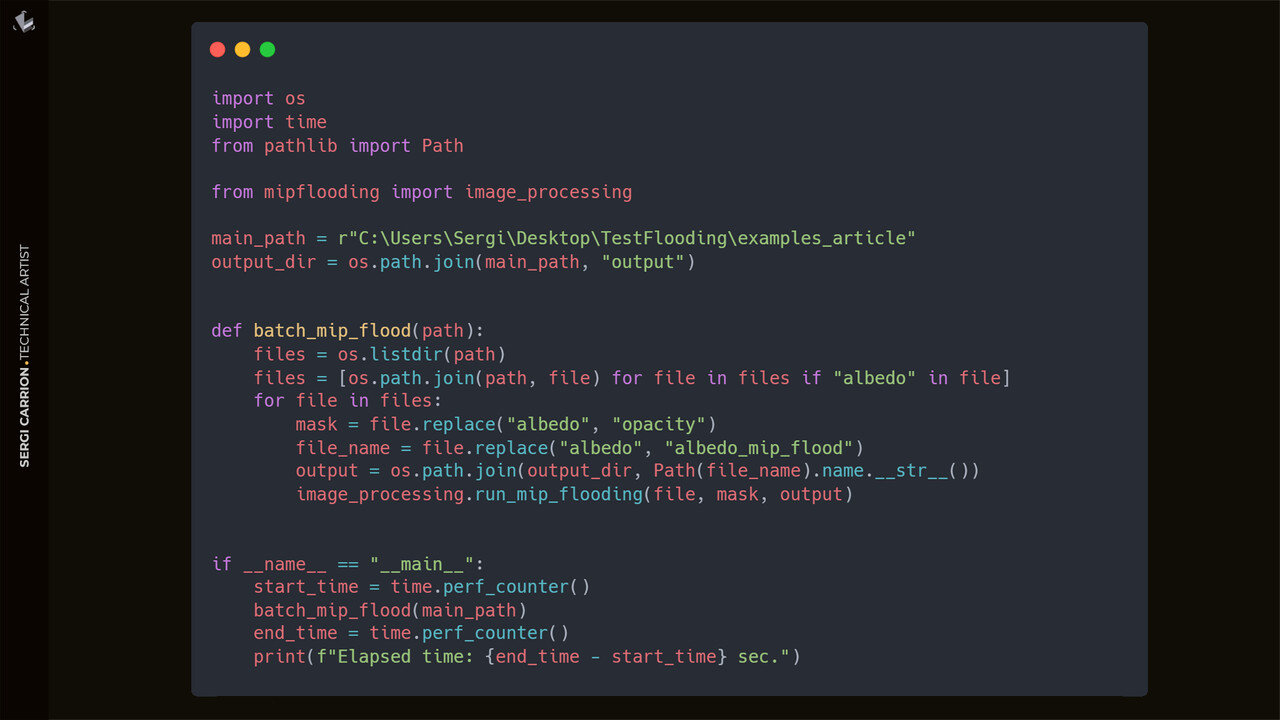
Once you've placed the package in your preferred location (whether within your Python libraries or a custom directory, with the option of using sys.path.append or any other approach), importing the image_processing module becomes straightforward. Just as demonstrated in the example below, you can seamlessly scan a directory, apply mip flooding to all the textures, and store the optimized versions in an "output" directory.
Summing up
- Place the package.
- Import the image_processing module into your Python script.
- Build your logic on top.
In the example code below, there's a function called batch_mip_flood that scans the specified directory for textures. It identifies albedo textures and matches them with their corresponding opacity masks, and then processes them with the mip flooding algorithm.

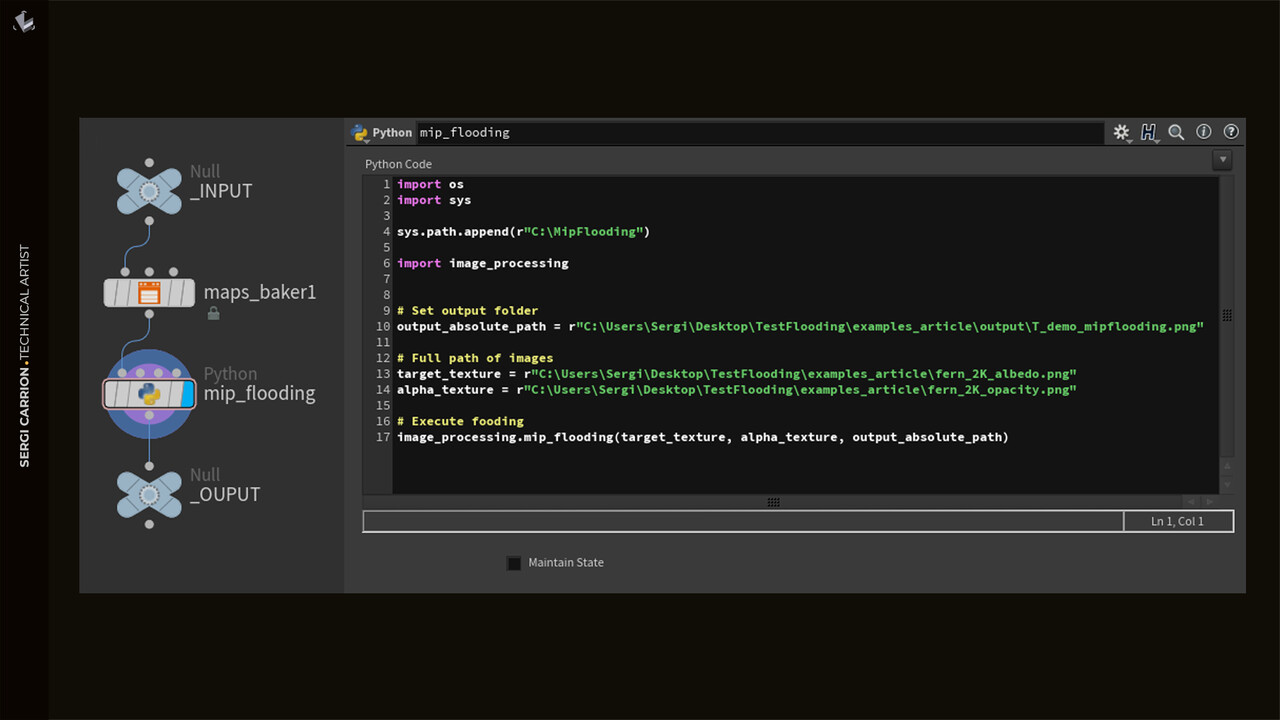
Here's another example setup from Houdini, where you could be baking some textures, and treating them after with a couple of python nodes. If working in a proper work environment, maybe the module is already loaded by the 456.py or the pythonrc.py startup script.
From Unreal, using the Execute Python Script node, you have the flexibility to make your own Editor Utility Blueprint or, alternatively, design an Editor Utility Widget complete with a user interface just to give a couple of examples of potential use cases.
Insights
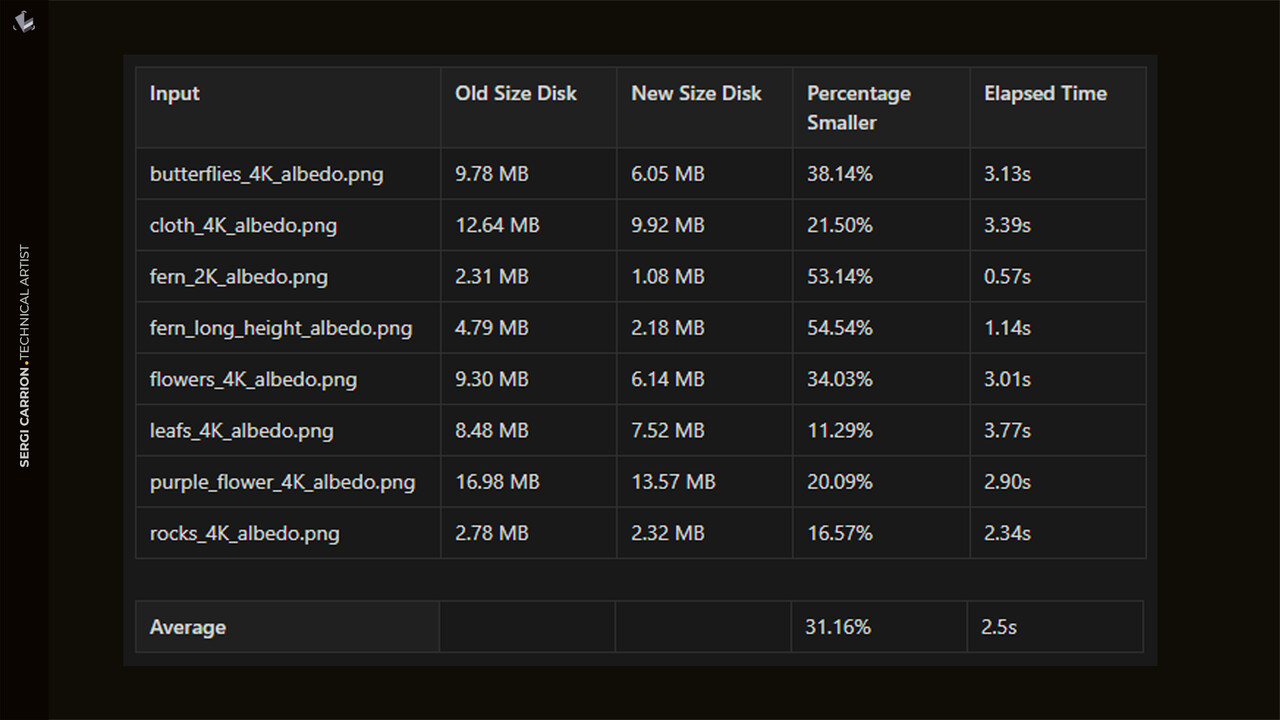
From the statistics gathered by running the mip flooding algorithm on a set of 8 images from the Megascans library, a few conclusions can be drawn:
Significant Disk Space Savings: The mip flooding algorithm consistently reduces the size of textures on disk. On average, on my tests, the new size on disk is approximately 31.71% smaller than the original, which is a substantial reduction.
Variable Reduction Rates: The degree of size reduction varies from image to image but remains consistently substantial. The algorithm achieves impressive reductions, ranging from 12.03% for certain images (e.g., "leafs_4K_albedo.png") to more than 55% for others (e.g., "fern_long_height_albedo.png").
Efficient Processing: The processing time, on average, is relatively low, with an average elapsed time of 2.5 seconds for each image. This efficiency makes it feasible to integrate this optimization step into a game development pipeline without significantly impacting production workflows.
Balanced Trade-off: While achieving reductions in file size, the mip flooding algorithm maintains the essential visual quality and consistency required for in-game textures. This balance between efficient compression and preservation of visual integrity is a critical feature in my opinion.
In conclusion, the mip flooding algorithm proves to be a valuable tool for Technical Artists and game developers seeking to optimize texture sizes efficiently. Its consistent ability to reduce file sizes, coupled with a reasonable processing time, makes it a promising approach to address the ever-growing challenge of managing storage requirements in modern game development. While the GDC talk primarily focuses on its application in foliage, considering the manifold advantages, this technique holds the potential for broader utilization in any scenario where texture flooding is applied.
What's Next?
Having explored the power and potential of the Mip Flooding Algorithm, I am already thinking about short term improvements:
1. Support for Packed Textures with Alpha Channel:
While the algorithm is already effective in optimizing textures, expanding its support to packed textures with an alpha channel will further enhance its versatility. Packed textures are common in game development, and adapting the algorithm to handle them seamlessly would be a valuable addition.
2. Selective Mip Flooding for Specific Channels:
Currently, the algorithm applies mip flooding to the entire texture. A future improvement could involve allowing users to selectively apply mip flooding to specific color channels, such as red, green, or blue. This level of customization would enable even more precise control over the optimization process.
3. Integration of NumPy + PIL:
To further boost performance, the use of NumPy in combination with PIL (Python Imaging Library) can be explored. NumPy is a powerful library for numerical operations, and integrating it with PIL could lead to more efficient and customizable mip flooding processes.
4. Release a Version with a Setup Installer:
To simplify the installation process and adoption of the algorithm that's available now on my GitHub.
Last notes
Lastly, I'd like to emphasize my approach to releasing these tools. I aim to ensure that their implementation remains flexible. I have no intention of dictating rigid workflows, naming conventions, limitations and so on. If you're an artist or part of a small studio interested in utilizing these tools but find yourself in need of guidance, please don't hesitate to reach out to me via LinkedIn.
And that's it, if you made it this far, thank you for reading :)


